Saturday, October 22, 2016

Fright Night


Scrapkit-  Night of Fright by Melissa's Creationz.
Mask 203 by Simon HERE.


Template 2013KandeeHalloweenCollabs_4  
by Dangerously Delicious Designs HERE.

This font Halloween Party
I used the awesome art of Popeye Wong.


Shift D to Duplicate. Delete Info layer, cat, and word back shadow layers. 
Resize your Canvas to 800x800 or larger and fill your background layer with white.
Starting from the bottom,  add a new layer, select all, and Copy and paste paper 1 into selection.  Deselect- Add your mask of choice or the one I used--Mask 203 From Simon.
For the Template layers, Select all, float, defloat,
then add a new layer and copy and paste each paper into selection:

Orange Circle- Paper 12.
Green Square -- Paper 3 Resized 85%.
Teal rectangle - Paper 1 resize to 85%.
Purple rectangle - Paper 6 resized to 85%.
Large green circle   -- Paper 12 into selection.
Dotted circle -- Manual color correct to white.  Duplicate. 
Purple rectangle - Paper 4 Resize to 85%.
Orange square  -- Paper 7.
Teal circle -- Add a new layer, fill with black.
Hand coming out of ground 75%.
Copy and paste the Skull and place to the right of the hand. Layer properties on screen.
Black dotted frame Manual color correct to white and duplicate.
Orange stripe -- PP 5  resized to 85%.
Teal stripe --   Add a new layer, fill with #fe9214.
Small green circle -- Add a new layer fill with white. Add noise. 
Eyeball resized 80%- Place over circle layer. 
Bats layer- Mirror and move back over to right -  add drop shadow.
Add your tube - I used a Popeye tube, Which I  resized 75%. Drop Shadow.
Duplicate your wordart layers, add a gradient glow and drop shadow. 
Spider resized to 65%.
Element 23 - Poison resized 75%.
Pumpkin --  Element 16 - resized to 80%.
Cat resize to 50%.
El 27 - Resize if you want- I did not resize.
  Move this layer to bottom, just above mask layer. Duplicate 
and mirror. Duplicate- Flip, Duplicate and Mirror.
Crop or resize to the size you want.
Add your watermark if you wish, and make 
sure you add the copyright for the image you used.
Add your name or name(s) of whoever you want.

I saved mine as a PNG image.
You are done!

Please tick the boxes below and let me know how 
you like my tutorial. I would love to see your results!


Monday, October 3, 2016

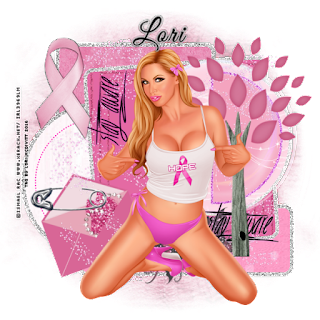
Stay Aware


This is a fairly quick and easy tutorial. 
You will be making a tag similar to mine:


Feel free to adlib, add, subtract and replace anything in this tutorial.
In essence, make this tag your own! 

For this tag, I used a

Kit by Gothic Inspirations's  BCA Kit HERE.
  Mask HERE.
I used Suz's Mask 2.
BCA Template by Millie--


Eye Candy 4000 Gradient glow.
Fonts used -- Pixelette for copyright and GoodVibrations.

The tube was a free tube from Ismael Rac's Store.
It is called 2014 BCA Girl. 


Ok-Let's Begin!

Shift D to duplicate your template. Delete Credits.

Image Canvas size --Resize Template to 700x700.
Activate Background layer and finish filling it with white.
Activate layer just above background layer. Click on it with your magic wand, add 
a new layer and copy and paste Paper of choice into selection.
Deselect. 
Layers- New mask layers- Find your mask in the drop down menu. Click ok.
Layers merge, merge group. I duplicated my mask to bolden it up a bit.
For each paper layer below, Select the layer with
your magic wand... Then I just copied and pasted the paper as a new layer-Selections invert- Then delete:
Layer 1 --Paper 7.
Layer 2- Paper 2.
Layer 3--Dotted lines. I duplicated this layer and used the manual color correction
tool to colorize it to pink. Then I duplicated the layer to make it more visible.
Layer 4- Paper 10.
Layer 5 -  Paper 5.
Layer 6 - Paper 3.
Layer 7 --Paper 2--- Add a new layer and copy and pasted this paper into selections.

For each of the layers above, I added a white frame with noise. 
How I did this-- Select the original layer-- not the paper layer selections, expand by 5 add a new layer and fill with white. Contract the selections by 7 or 8---I did 8. Delete--You should have a frame. Now add your noise. I used 100--Use whatever setting you want and like.
Move the layer above your paper layer and drop shadow it.
Layers 8 & 9 are the wordart---I just added a gradient glow to them and gave them a drop shadow of 1, -1, 50, 0. 

Elements Used--
Bubble- Resized about 50%. Place over your circle layer. You may need to use
your raster deform tool to form it around the circle.
Envelope  Resized 50% - Rotate 20 degrees left.
Wings- resized ti 35%.
Glitter Trail-75% - Duplicate and mirror.
Safety Pin- Resized 50% ---See my tag for placement on envelope.
Tree of Life resized to 65%.
BCA Ribbon resize to 50%.

Resize your tag to whatever you want- I usually have
mine to around 600x600.

Add your watermark if you wish, and make 
sure you add the copyright for the image you used.
Add your name or name(s) of whoever you want.

I saved mine as a PNG image.
You are done!

Please tick the boxes below and let me know how 
you like my tutorial. I would love to see your results!


Hellooooo! --FYI


I know it has been a while--Almost
2 months to be exact.
However, I have moved to a different
place Plus, my job and my duties in the Creative Chicks
Forum keep me very busy.

However, I do have a tutorial I am almost done with,
and I will be posting it tonight or tomorrow.

Please be patient!