Saturday, December 31, 2016

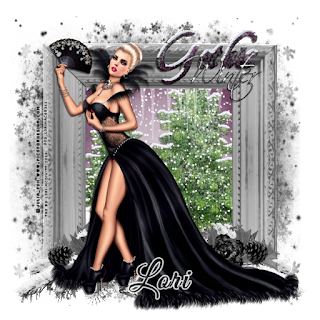
Last tutorial of 2016! --Dark Winter


This is my last tutorial of 2016. 
I know I haven't posted a lot, but I hope 2017 will be better
in the tutorial writing and posting area for me.


So on that note, here ya go! 


The above tag is made by using the materials below:

Tube by Julia fox found at Pics For Design.   


Mask  #4  HERE .
Gothic Winter Scrapkit  By Gimpnastic Scraps HERE.

Font of choice.

New Image 600x600 Transparent.
Select all - Add a new layer and copy and paste paper 4 into selection. 
Add your mask, merge, merge group.
Copy and paste Frame 2 onto your canvas, and copy and paste Element 21 and move near bottom of frame layer. Duplicate and mirror.
Copy and paste Element 5 and resize it to 25%. Add Drop shadow.
Move it over to one side, duplicate it and mirror. I duplicated it a couple of more times. 
Find a tree of choice and copy and paste it just below the frame. Resize it to 
fit your tag. Duplicate it a time or two and move the trees to your desired locations.
Copy and paste Element 28 onto your canvas. Resize it to just fit below the frame layer.
If you need to, duplicate it and arrange it so it
covers the frame layer. 

El21, Duplicate and mirror.
Element 7  Resized to 30%. Duplicate.
Now, copy and paste your.
Wordart from kit or word art of choice.

Add your watermark if you wish, and make 
sure you add the copyright for the image you used.
Add your name or name(s) of whoever you want. 
For my name, I duplicated the layer and on the 
bottom layer added a white Fat Gradient glow.
I also added a drop shadow of 1, -1, 5, 0. 
I saved mine as a PNG image.
You are done!

Please tick the boxes below and let me know how 
you like my tutorial. I would love to see your results!


Celebrate


For the tag above, I used
Pellinka scraps Happy New Year Kit  HERE.

Font- Hooked on booze.  For the name, 
I used Paper 4 - Material properties on 0/35.
Mask of choice. I do not remember which
mask I used. As soon as I figure it out, I will
edit this post. 

Open a new image, 640x640 or a size you prefer, transparent.
Open a paper of choice and paste it as a new layer.
Add your mask. I duplicated mine a few times to cover part of the canvas.
Copy and paste element s(2) and move to the left a bit. Duplicate this
layer and mirror. 
I colorized mine to a red and light blue. 
Copy and paste the clock and resize if you want. I did not resize mine.
Move the clock down your canvas a bit. 

Elements I used and their sizes:
s - 21  85%.
52 - 75%.
s - 34  55%
Position your elements the way you want.
Crop and resize your image to your preference.

Add your watermark if you wish, and make 
sure you add the copyright for the image you used.
Add your name or name(s) of whoever you want. 
For my name and wordart, I duplicated the layer and on the 
bottom layers added a yellow Fat Gradient glow.
I also added a drop shadow of 1, -1, 5, 0. 
I saved mine as a PNG image.
You are done!

Please tick the boxes below and let me know how 
you like my tutorial. I would love to see your results!


Monday, December 26, 2016

Hello and a belated Holiday Greeting!


Sorry I haven't been on lately,
 but on here today to wish everyone
a very happy holiday season.

I cooked and cleaned most of the day, yesterday,
and my son and a friend of his came over for 
a bite to eat. 

I hope everyone had a very happy Christmas. 

Please be safe this holiday season and
do not do any type of  driving distracted, and please
do not drink and drive! 


I will be back with more tutorials soon! 


Tuesday, November 29, 2016

Paawty Time!


Millie's Template #240  HERE.


I used an image of Gail Gastfield's. Her site HERE


Sassy Dede's kit here---part of a collab
http://sassydede.blogspot.com/2014/09/birthday-wishes.html
Mask 114  by   me  HERE:
http://lorispspgraphics.blogspot.com/2015/06/another-mask.html
Font called Bromello
HERE:  http://www.dafont.com/bromello.font

Drop shadow I used   1, -1, 50, 0, Black


Open template Shift D to duplicate. Delete Credits and Wordart layers.
Image Canvas Size to 800x800 or a size you prefer.
Start from bottom.

Add your papers to your template layers.
Here is how I did mine:

Rasters 1 & 2 -- Merge together. Select all, Float, Defloat.
Copy and paste Paper 30 Resized to 80% as a new
layer. Selections Invert-Delete Excess.
Merge Rasters 3 & 4- . Select all, Float, Defloat.
Copy and paste Paper 20 . Selections Invert-Delete Excess.
Merge Rasters 5 & 6 --   Select all, Float, Defloat.
Copy and paste Paper 5 as a new layer. Selections Invert-Delete Excess.

Rasters 7 & 8 --  Select all, Float, Defloat.
Copy and paste  Paper 6 Resized to 70% as a new
layer. Selections Invert-Delete Excess.

For Raster 9 I used 2 papers- Paper 8 and Paper 15.
Here is how I did it--
Select the circle layer- select all, float, defloat, copy and paste paper 15 as a new layer. 
Selections invert, Delete the excess. Do not deselect yet---
Selections invert, add  a new layer and paste paper 8 into selections. Deselect. 
I put the layer proper ties on overlay.
I duplicated the layer twice. (Just do whatever you want to make it
how you like it.) 
Raster 10 -- The Dotted Circle. I colorized to white. 
Here is where I resized my template by 75%--all layers Checked.

 Now for elements I added:

Balloons 2 resized to 20%.
Balloons 4 resized to 20%.
Blimp resized to 20%.
Box  resized to 20%.
BWSD-WOA6 resized to 30%.
Cake resized to 25%.
Chocolate bar resized to 25%.
Dogs  resized to 25%.
Dust  resized to  75%.
Dust 1  resized to  85 - Duplicate, Image Flip, Image mirror.
Gift 2 resized to 55%.
Kite resized to 45%.
Poppers Resized to 20%.

Add your tube wherever you want.
I add my Gail Gastfield tube below 
the Dogs layer and resized it 70%.

Add your watermark if you wish, and make 
sure you add the copyright for the image you used.
Add your name or name(s) of whoever you want. 
For my name, I duplicated the layer and on the 
bottom layer added a Fat Gradient glow.
I also added a drop shadow of 2, -2, 5, 0. 
I saved mine as a PNG image.
You are done!

Please tick the boxes below and let me know how 
you like my tutorial. I would love to see your results!


Simply Autumn


The above tag is how mine turned out from the tutorial below. 

Here is what you will need. Of course, you can use any Kit, tube or embellishments 
that you want. This is a very simple tutorial, hence the name. 

Tube - Eugene Rzhevskii. You can find his work here at Pics for Design.


Mini Kit from HERE Called  Autumn Pallette by KJD Designs. 


Font:  AllisonRob 


Open up the Frame 1 and copy and paste it onto your canvas. Resize it to 26% then resize again to  80%.
Grab your magic wand and put it on freehand and draw a circle on top of the frame. Add a new layer and move this layer under the frame. Open up a paper of your choice (I chose paper 5.).

Copy and paste your paper into selection. Deselect. I found a tree and paste it on top of the paper. 
Add your tube, and resize as needed. I resized mine to 30%. Now, duplicate it and move the duplicate above the frame layer. 
Get your eraser tool and erase all the parts showing above the frame. 
Add the brick wall mask just below the frame layer and resize it to your liking.
I resized mine to 20%. I then moved it to the top and duplicated it. Image flip, Image duplicate Image mirror, then duplicated it and flipped it again making like a mask. 
I colorized each layer with the sepia overtone setting. 
Add your elements of choice. 
I chose the Jam and Latte and resized them to 10%.
I also added a vine brush that I found by FallnStock on deviantart.com. 

Add your watermark if you wish, and make 
sure you add the copyright for the image you used.
Add your name or name(s) of whoever you want. 
For my name, I duplicated the layer and on the 
bottom layer added a Fat Gradient glow.
I also added a drop shadow of 2, -2, 5, 0. 
I saved mine as a PNG image.
You are done!

Please tick the boxes below and let me know how 
you like my tutorial. I would love to see your results!


Thankful Fall


Tube ©Creo http://www.creographix.at
Creo's Site is no longer available. 
Please use an image of choice. 

Thanksgiving Kit by Melissaz Creationz.


Template by Chantal HERE

Stacies Mask of  Moonbeam and Spider Webs HERE
I used mask 1. 

Turkey Sandwich Font.         


Open your template, Shift D to duplicate. Delete or hide credit layers. 

I start from the bottom. Select all, add a new raster layer copy and paste a paper
of choice into selection. I chose paper 6. Add your mask from image or from disc.

Now here is how I did my paper layers:

Most of the layers,, unless otherwise indicated, I added a new layer, select all and
copy and pasted the paper into selection.

Raster 3 -- Paper 4
Raster 8 -- Select all, float, defloat  Copy and paste paper 8 as a new layer. Resize to 60%.
Selections invert, delete excess. 
Raster 9 -- I left alone. 
Raster  5 -- Paper 7.
Raster 6 -- Paper 5. 
Raster 10 -- I left alone. 
Raster 4 --Paper 6 Resize to 65%. -- Select all, float, defloat  Copy and paste paper 6 as a new layer. Selections invert, delete excess. 
Raster 2 -- I filled with #bd6313.
Raster 7 -- Paper 1. 

For all of the template layers, I added a white layer with noise. 
My Tutorial for that is HERE.  
Rasters 11 & 12 -- Wordart layers. I duplicated them and added a gradient glow
to them and noise at 100%.  I also colorized the top layers to black, using the manual color correction tool. 


Now for the elements:
El 3  resized to 45%. move to one side, duplicate and mirror.
El 12 resized to 65% Rotate right -- 90
El 11- 50%. Move to one side, duplicate and mirror.
El 4 resized to 50%.
El 10- 75%.
I found some leaves-- can't remember where, and added them behind my tube.
I also added the word Everyday, using the Windsong font.


Add your watermark if you wish, and make 
sure you add the copyright for the image you used.
Add your name or name(s) of whoever you want. 
For my name, I duplicated the layer and on the 
bottom layer added a Fat Gradient glow.
I also added a drop shadow of 2, -2, 5, 0. 
I saved mine as a PNG image.
You are done!

Please tick the boxes below and let me know how 
you like my tutorial. I would love to see your results!


Saturday, October 22, 2016

Fright Night


Scrapkit-  Night of Fright by Melissa's Creationz.
Mask 203 by Simon HERE.


Template 2013KandeeHalloweenCollabs_4  
by Dangerously Delicious Designs HERE.

This font Halloween Party
I used the awesome art of Popeye Wong.


Shift D to Duplicate. Delete Info layer, cat, and word back shadow layers. 
Resize your Canvas to 800x800 or larger and fill your background layer with white.
Starting from the bottom,  add a new layer, select all, and Copy and paste paper 1 into selection.  Deselect- Add your mask of choice or the one I used--Mask 203 From Simon.
For the Template layers, Select all, float, defloat,
then add a new layer and copy and paste each paper into selection:

Orange Circle- Paper 12.
Green Square -- Paper 3 Resized 85%.
Teal rectangle - Paper 1 resize to 85%.
Purple rectangle - Paper 6 resized to 85%.
Large green circle   -- Paper 12 into selection.
Dotted circle -- Manual color correct to white.  Duplicate. 
Purple rectangle - Paper 4 Resize to 85%.
Orange square  -- Paper 7.
Teal circle -- Add a new layer, fill with black.
Hand coming out of ground 75%.
Copy and paste the Skull and place to the right of the hand. Layer properties on screen.
Black dotted frame Manual color correct to white and duplicate.
Orange stripe -- PP 5  resized to 85%.
Teal stripe --   Add a new layer, fill with #fe9214.
Small green circle -- Add a new layer fill with white. Add noise. 
Eyeball resized 80%- Place over circle layer. 
Bats layer- Mirror and move back over to right -  add drop shadow.
Add your tube - I used a Popeye tube, Which I  resized 75%. Drop Shadow.
Duplicate your wordart layers, add a gradient glow and drop shadow. 
Spider resized to 65%.
Element 23 - Poison resized 75%.
Pumpkin --  Element 16 - resized to 80%.
Cat resize to 50%.
El 27 - Resize if you want- I did not resize.
  Move this layer to bottom, just above mask layer. Duplicate 
and mirror. Duplicate- Flip, Duplicate and Mirror.
Crop or resize to the size you want.
Add your watermark if you wish, and make 
sure you add the copyright for the image you used.
Add your name or name(s) of whoever you want.

I saved mine as a PNG image.
You are done!

Please tick the boxes below and let me know how 
you like my tutorial. I would love to see your results!


Monday, October 3, 2016

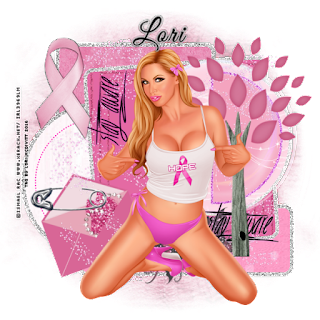
Stay Aware


This is a fairly quick and easy tutorial. 
You will be making a tag similar to mine:


Feel free to adlib, add, subtract and replace anything in this tutorial.
In essence, make this tag your own! 

For this tag, I used a

Kit by Gothic Inspirations's  BCA Kit HERE.
  Mask HERE.
I used Suz's Mask 2.
BCA Template by Millie--


Eye Candy 4000 Gradient glow.
Fonts used -- Pixelette for copyright and GoodVibrations.

The tube was a free tube from Ismael Rac's Store.
It is called 2014 BCA Girl. 


Ok-Let's Begin!

Shift D to duplicate your template. Delete Credits.

Image Canvas size --Resize Template to 700x700.
Activate Background layer and finish filling it with white.
Activate layer just above background layer. Click on it with your magic wand, add 
a new layer and copy and paste Paper of choice into selection.
Deselect. 
Layers- New mask layers- Find your mask in the drop down menu. Click ok.
Layers merge, merge group. I duplicated my mask to bolden it up a bit.
For each paper layer below, Select the layer with
your magic wand... Then I just copied and pasted the paper as a new layer-Selections invert- Then delete:
Layer 1 --Paper 7.
Layer 2- Paper 2.
Layer 3--Dotted lines. I duplicated this layer and used the manual color correction
tool to colorize it to pink. Then I duplicated the layer to make it more visible.
Layer 4- Paper 10.
Layer 5 -  Paper 5.
Layer 6 - Paper 3.
Layer 7 --Paper 2--- Add a new layer and copy and pasted this paper into selections.

For each of the layers above, I added a white frame with noise. 
How I did this-- Select the original layer-- not the paper layer selections, expand by 5 add a new layer and fill with white. Contract the selections by 7 or 8---I did 8. Delete--You should have a frame. Now add your noise. I used 100--Use whatever setting you want and like.
Move the layer above your paper layer and drop shadow it.
Layers 8 & 9 are the wordart---I just added a gradient glow to them and gave them a drop shadow of 1, -1, 50, 0. 

Elements Used--
Bubble- Resized about 50%. Place over your circle layer. You may need to use
your raster deform tool to form it around the circle.
Envelope  Resized 50% - Rotate 20 degrees left.
Wings- resized ti 35%.
Glitter Trail-75% - Duplicate and mirror.
Safety Pin- Resized 50% ---See my tag for placement on envelope.
Tree of Life resized to 65%.
BCA Ribbon resize to 50%.

Resize your tag to whatever you want- I usually have
mine to around 600x600.

Add your watermark if you wish, and make 
sure you add the copyright for the image you used.
Add your name or name(s) of whoever you want.

I saved mine as a PNG image.
You are done!

Please tick the boxes below and let me know how 
you like my tutorial. I would love to see your results!


Hellooooo! --FYI


I know it has been a while--Almost
2 months to be exact.
However, I have moved to a different
place Plus, my job and my duties in the Creative Chicks
Forum keep me very busy.

However, I do have a tutorial I am almost done with,
and I will be posting it tonight or tomorrow.

Please be patient!

Friday, August 12, 2016

Soccer Bear


Soccer Bear


We will be making a tag somewhat of the one below:


Items I used are as follows:

Tube By Creographix--Site no longer available, please use a 
tube of choice. 
Scrapkit called Gaming Attitude by Babs Bitsy Bee here: 
Mask by Roses Black Creative- #79 ---  HERE
Mura Meister Cloud-- freeware--  HERE
Fonts Used:  Care Bear Family and Walt Disney Script. 


Ready? OK! Let's Begin!


New  Image  --  700x700 or what you prefer. 
Here is how I made my grass and sky layers. You may want to find  grass and sky  tubes for yours if you do not want to go through all of the following steps: 
Select all - New Raster layer. Copy and Paste a paper of choice into selection. I used paper 2.
Add your mask, layers, merge, merge group.
Select all, float, defloat, add a new raster layer. Mura meister cloud- default setting.

 Move the Mura meister cloud  layer to one side, just a little bit.
Layers duplicate- Image mirror. 
Duplicate again and resize to about 50%. Image rotate 90 degrees...Left or right---does not matter. Now, colorize it to green  by going to adjust- Hue and saturation- 100/255.
Move to one side. Duplicate and mirror. Duplicate and move this layer
in middle. Making sure you overlap each layer. 
Now we add our elements. I used:
Branch 50%. Duplicate-Mirror- Resize this one another 75%. 
Leaves 3 resized to 45%. Duplcate mirror.  Resize this one to 75%.
BBD_Trophy 50% -- For the wording on the trophy I used the Care Bear Family font.
Banner 1 -40% 
Soccer Goal - -- 50%.
Add your watermark if you wish, and make 
sure you add the copyright for the image you used.
Add your name or name(s) of whoever you want. 
For my name, I duplicated the layer and on the 
bottom layer added a Fat Gradient glow.
I also added a drop shadow of 2, -2, 5, 0. 
I saved mine as a PNG image.
You are done!

Please tick the boxes below and let me know how 
you like my tutorial. I would love to see your results!


Wednesday, July 6, 2016

Fire!!


Here is what we are going to be making--
Well at least similar!  LOL


Supplies I used are as follows:

Cute Tube by Creo. The site is no longer online. I do not 
know where to get Creo's tubes anymore.
Please substitute it with one of your choice, if you 
do not have it...or even if you do! LOL


FTU Kit - "Guard Of Flame" by Neferwene.

Thank you for a great kit to work with!

Font - Hothead font.

Mask of choice or the one I used here: -
Wordart  of choice, or you may use mine-
Just  click to enlarge and Right click to save:


Ready? OK!  Let's begin! 

New Image 600x600. 
Select all, Add a new raster layer.  Copy and paste
 paper 5 into selection. Rename this layer paper 5.
Add your mask from image or from disc--I used   LLM_142.
Layers, Merge, Merge Group. 

Elements I used are:
Truck to 50%.
Hose to 20%.
Fire extinguisher resize to 8%.
Creo tube- 75%.
Helmet  resized to 10%.
 I used the fire tube from my psp.

Resize yours to your liking. 
Duplicate and Mirror. And I resized mine 75%.

Add wordart of Choice.
I added a thick gradient glow to mine.

For my name, I used paper 5 from the
kit and colorized it to red.
I also added a thick Gradient glow and drop shadow.

Place all elements to where you like them. 
See my tag above for reference. Please remember 
to make your tag your own. 

Add Drop shadow to all layers except mask layer. 
Add the copyright to the image that you used
and your watermark if you wish. 
Save as a png or JPG image. I saved mine as a PNG. 

Please tick the boxes below to let me know how you liked
my tutorial.


Sunday, June 26, 2016

The Patriot


Tube by Creo. The site is no longer online. I do not 
know where to get Creo's tubes anymore.
Please substitute it with one of your choice, if you 
do not have it...or even if you do! LOL

Template 273 by Millie -- Thank you Millie! 
Download from HERE.  

Patriotic Scrapkit by Monti HERE.
Thank you Monti for creating such an wonderful kit to play with! 
 Bodie MF font. 


Mask of choice  or use the one I used--My Mask HERE on my blog.
It is the last one in the post. 

Ready? Ok! Let's Begin! 

Shift D to duplicate your template. Close the original. 
Delete Millie's info layer.  Image- Canvas size 800x800. 

Starting from bottom layer, Select all, add a new raster layer, and copy and
paste Paper 3 of Monti's Kit into selctions.  Deselect. Add your mask or mine. 
Layers-merge-merge group.
***Note about adding papers. To add a paper, copy and paste into selections as a 
new layer, unless otherwise intructed. **
Raster 1  -- Paper 15
Click on Raster 2- Select all, float, defloat. Copy and paste Paper 17 onto your canvas  Resize to 92%. Selections invert. Delete. Deselect. 
Raster 3- Flag paper into selections
Raster 4 White stars paper resized 78%.
Raster 5  Paper 14.
Scalloped Frame of choice. I used Frame 18 and Resized to 95%.
 Place this over your paper 14 layer. 

Select Raster 10- select all, float, defloat, add a new raster layer . 
Copy and paste Paper 21 into selections.  
Selections modify expand by 3.  Copy and paste Paper 20 into selections. 
 Move the Paper 20 layer down under Paper 21. 
Glitter White resized to 50%.
Layers 6-9 I colorized them to red and added noise to them. 
Glitter blue resized 50%.
Glitter red resized 50%.
Flag 1 resized to 40% .
Raster 11 Paper 19- I duplicated mine
 a couple of times to see it better. 

Blue sunflower resized 40%.
White and red sunflower resized to 50%.
White sunflower resized 40%.
Red Sunflower resized 40%.
Glitter blue resized 50% Duplicate.
Glitter red resized 50% Duplicate.
Glitter White resized to 50% Duplicate.
 Place the glitters and their
duplicates  where you want them.

Red, white, and blue balloons, or balloons 
of your choice.   I re sized mine 40%.
Blue balloon resized to 50%
I added my tubes just above this layer. 
Gothic Inspirations wordart 75%.

Crop and/or resize your tag to your liking. 
Add your name or whatever names you want to. 
 I used Bodie MF font for my name and a gradient glow.
Add your watermark if you wish and the copyright to 
the artist tube you used. 


Please tick the boxes below and let me know how 
you like my tutorial. I would love to see your results!
Friday, June 3, 2016

My Dad


Here is what we will be making:


The image I used is by Arthur Crowe.   HERE.

Template #76 from Clarez -- Here.

Thank you for this beautiful template, Clarez!

Scrapkit from Amy and Leah called Dear Old Dad Here

Thank you for making this beautiful kit!
Mask of choice. The one I used is called  LLM_188.
You can find it HERE.


Shift D to duplicate and delete circle1 frame layer and  
Clarez's info which is the plz delete layer.

Now on your bottom layer, Select all add a new raster layer, copy and paste
paper 1 into selection. Add your mask from image. (You can also put the mask in your program's Mask folder and add it from disc.)   Layers Merge-Merge Group.
Now, click on the circle1 bg layer, select all, float defloat, add a new raster layer, --get a paper of choice- I chose paper 3, and paste it into selection. -Do not deselect--
Get your close-up and copy and paste it as a new layer. Resize if you want, I did not resize mine. 
Selections, invert, delete.
Copy and paste frame two from kit and put it over this layer.
Circle3 bg layer- Select all, float defloat, add a new raster layer, copy and paste paper 9 
into selection. 
Frame 6  resized to 59% Used raster deform tool to form around the small circle 3 layer.
Add your tube. Copy and paste Fish as a new layer and resize 50%. Place at top behind your main tube layer.
Copy and paste fishing pole as a new layer. Move to far left. 
Wallet resized 35%.
Keys  Resized to 25%
Words glow Layer- add a drop shadow of choice. 
Raster 2- Select all, float, defloat, add a new raster layer, copy and paste a paper of choice into selection. I chose Paper 1.
Copy of Raster 1- I added a thick  white gradient glow.
I also added a drop shadow. 
Raster 3---Dad wordart layer, Add the same gradient glow and drop shadow as before.


Add any other elements you want and dropshadow all desired.

Add your watermark if you wish, and make 
sure you add the copyright for the image you used.
Add your name or name(s) of whoever you want. 
For my name, I duplicated the layer and on the 
bottom layer added a Fat Gradient glow.
I also added a drop shadow of 2, -2, 5, 0. 
I saved mine as a PNG image.
You are done!

Please tick the boxes below and let me know how 
you like my tutorial. I would love to see your results!


Friday, May 6, 2016

Attitude


I know it has been a while. However,
I do have a tutorial for you tonight, and 
I will be editing more tutorials and posting 
them real soon! 

Now, on to the tutorial! 


Here is what we will be making:


The tube is an exclusive to the Creative Chicks forum. You MUST be a member 
of the forum to get this tube.  


Scrapkit by  Vaybs from the Creative Misfits blog HERE.

I also used a couple of elements from Rieka's kit. 

Template 234 by  Millie  located HERE

Wordart by Vaybs  HERE.

Mask of choice or use the one I used  HERE.

I used mask 3 from My (Lori2165) Set.

Font: Coneria Script.

Open the template, Shift D to duplicate. Delete the credit layer.  Starting from the bottom 
Add a new raster layer and copy and paste paper 13 into selection. Deselect. Add your mask from image or disc-wherever you put your mask into. 
Layers-merge-merge group. 

I used the texture settings below for the mask layer.:


For each template layer, I added a new raster layer, selected all, and copied and pasted the
paper into selection. I also added a layer underneath it and added a noise border to each. 

To see how to do this, go here:   Alternative to Gradient Glow Tutorial.

 For raster 1, I used Paper 3.
Raster 2, I used paper 4.
Rasters 3 and 4,   I colorized to white using the manual color correction tool. 
Raster 5 I used Paper 2.
Raster 6 I used Paper 18.
Raster 7 Paper 7.
Raster 8 - I duplicated it a couple of times to bolden the dotted lines.
Copy and paste your tube and the wordart by vaybs-both as new layers.
Resize each to your liking. 

Elements I used and their resizes are as follows:
RR- Flower 1  40%.
RR_Sparkles1  50%. Duplicate, Mirror, Flip. 
Element 34 resized to 25%.
Element 51- 40%.
Element 9 - 30%.
Add any and all the elements you want---make the tag your own! 

Add your watermark if you wish, and make 
sure you add the copyright for the image you used.
Add your name or name(s) of whoever you want. 
For my name, I duplicated the layer and on the 
bottom layer added a Fat Gradient glow.
I also added a drop shadow of 2, -2, 5, 0. 
I saved mine as a PNG image.
You are done!

Please tick the boxes below and let me know how 
you like my tutorial. I would love to see your results!