Friday, November 20, 2015

Thinking of Paris, France


The above tag was made in a challenge I participated 
in at the Creative Chicks. 

My personal heartfelt condolences go out to the people in Paris, France
and their families.  

Now to the tutorial on how I made the above tag:


For this tag I used
A Barbara Jensen Free tube  HERE.
Paris Dreams Kit by Scraps Dimensions HERE.
Mask of choice. The mask I used is  an exclusive to the Creative
Chicks. It will not be available until Dec 1, 2015 on our blog HERE.
However, if you  join our group HERE before then, you can get it.
Cajoline Paris By Night paper 1 HERE.


As always, I use Pixelette for my credits.

New Image 600x600 Transparent. 
New layer- select all, copy 
Paper 4 and paste into selection. Add your mask from disk or from image.
I resized mine by 95%.

Clock 65% . I set the properties to overlay.
Umbrella   65%  Then 75%.
Tube-I did not resize mine. 
Wordart-80%
For my name, I drew a vector circle around the clock and positioned and re-sized 
the circle to where I liked it. Do not convert it to raster, yet! 

 If you do not know how to do text on a curve,
I am not going into a tutorial within a tutorial about text on a curve. However, 
here is a great tutorial for text on a curve by Another Jo:


Add any other elements you want. 
Drop shadow  your layers except the mask layer. 

Add your watermark if you wish, and make 
sure you add the copyright for the image you used.
Add your name or name(s) of whoever you want.
I saved mine as a PNG image.

You are done!

Please tick the boxes below and let me know how 
you like my tutorial. I would love to see your results!


Thankful For Friends


Tube of choice. I used the incredible work of Cris Ortega
Scrapkit by Melissa called Thankful for Friends HERE.

Millies Thankful template MPM02 Here.
Mask of Choice-I used my LLM_114 mask here.


Eye Candy 4000 Gradient Glow- Optional.

Ready? Ok! Let's begin!
Shift D to duplicate and close original template.
From bottom- add a new layer select all, copy and paste Paper 3 into selections.
Add  a mask of choice or use my mask--LLM_114 from disc and merge group.
For each of the paper layers, I pasted the paper into selections, 
unless other wise instructed.

Below are the layers and papers I used for them. 
Of course, you may want 
to change it up as you see fit:

Rasters 1 and 2--Paper 7.
Raster 3 -- Paper 03.
Raster 4 -- Paper 6.
Raster 5 -- Paper 6-New layer re-size paper by 50% .
Rasters 6  and 7-- Paper 8-New layer, re-size paper by 50%.
I did this layer a bit different:
Raster 8   I used Paper 2.
 Select all, float, defloat, selections modify contract by 4, add a new 
raster layer copy and paste paper two into selections.
Then go to selections-modify, expand by 4, add a new raster layer 
and move under the paper layer. 
Then floodfill with white and add noise to this layer. Deselect. 
Raster 9 and raster 10 add a gradient glow and 
drop shadow to both wordart layers. 
Make sure you delete or hide all original layers. 

At this point I cropped mine and re sized all layers to where I got 
it to about a 625x564. 

If you get your tag even close to my tag's size, you should be able to
resize the following elements within a couple of percentage points.

I used:
El 4  copy and paste it onto your canvas, Re-size 80%,
 and Place to right side, duplicate mirror. 
Element 6 re-sized 40%.
El 8 re-sized by 40%.  D/S Place to right of wordart, duplicate and mirror.
El 10 Re-sized 65%.
El 11 re-sized to 65%.  Place to right side, duplicate mirror. 
Element 12 re sized 40%  Place to right side, duplicate mirror. 
El 13 re-sized 80%   Place to right side, duplicate mirror. 
El 14 --I did not re-size. 
El 17 --Did not re-size.
Element 19 re-sized 40%.
El 20 Re-sized 45%.
E-25 Hearts re-sized by 40%.

Add any other element you wish and re-size tag to your liking.
For my name, I used a yellow gradient glow- #f7ff00. Remember 
this is optional. 

Add your watermark if you wish, and make 
sure you add the copyright for the image you used.
Add your name or name(s) of whoever you want.
I saved mine as a PNG image.

You are done!

Please tick the boxes below and let me know how 
you like my tutorial. I would love to see your results!

Saturday, November 7, 2015

In Creddy-Bly Thankful


Here is what I used for the tag above:

Bibis Autumn Notes Kit by Bibi   HERE.
You will need  a password for the kits. 
Click on "Click to get the Password" on the left
side of her page. It will take you to her FaceBook page. If it
doesn't show it immediately, click on the 30 FTU kits link.
Sorry, I cannot provide the password here, so please do not ask. 
The image I used is by Creographix. 
Unfortunately, Creo's website is off line. 
Mask of choice. I used my mask LLM_114   HERE
You will also need some cloud elements. 
Rainbow Coffi has some good ones. You may find hers HERE.

Optional: turkey tubes.
(I also used the turkey tubes that came with my paint shop pro. I am sure you can 
find some tubes somewhere to use, if you want them in your tag.)

My Ground element here:


Note: Using this element is optional. You may make or find your own,  I made this and if you want to use it, fine, but please do not claim as your own. 
Fonts: Segoe Script and Pixelette for the credit layers. 

Ready? Ok! Let's Start! 

New Image 600x600 Transparent.
Add a new raster layer, Select all. 
Copy and paste paper of choice into selection. I used paper 4. 
Layers, Load/Save mask from disk-Find your mask and apply. Merge, Merge group.
Duplicate this layer and colorize it to a bluish color and set the layer properties on
overlay.
Add your cloud element(s). Re-size to your liking  and place them  where they look best to you. 
Now we can start adding our elements. 
54- Tree- Re-sized 75%.
Again, paste El 54- Tree on your canvas and this time Re size it 50%. 
Duplicate  and then  re-size to 85%. Move all  3 trees to where you like them.
Add your tube and re size it to where it fits best on your canvas. 
If you are using the same tube as I am, I re sized mine 80%.

El 58- Re-sized 60%. Duplicated and mirrored.
Duplicate one of these layers and re size to 80%.
I lined mine up behind the trees.
El 48-  30%.
 El 31- I did not re size. Duplicated about 4 times and mirrored a couple.
I just placed them around my tag. 
Element 27  re sized to 12%. Duplicate. 
36-Pumpkin-50% Duplicate  Duplicate 3 times and, 
I re sized one 50% and the other to 80% and duplicate this one. 
I added two turkeys from my PSP Program and placed them on the right side.
45- Squirrel  re sized 45%.
8- 30% duplicate -then  re size to 50% --Duplicate this one. 
Owl re sized to 35%
12- Mushroom -- 25% duplicate and mirror. Duplicate again and mirror
El 21 Re sized to  80%. Duplicate a few times and spread around your tag.

Add your watermark if you wish, and make 
sure you add the copyright for the image you used.
Add your name or name(s) of whoever you want.
I saved mine as a PNG image.

You are done!

Please tick the boxes below and let me know how 
you like my tutorial. I would love to see your results!


Friday, November 6, 2015

Attitude


Here is what I used for the tag above:
I used 2 Tubes by  Arthur Crow . They are  Exclusive tubes only 
at the Creative Chicks forum Here. You must be a member at the forum to
get them. 

Kristin Template 184 and her Kit Rock attitude on her blog here:

Kit Here.

Mask 3 From Rocked by Rachel Here.

Font -- AR JULIAN 
Wordart by Kathyfrances here.

Eye Candy  4000 Gradient glow -- Optional

Ready? Ok! Let's start!
Grab your template and Shift D to duplicate. 
Resize canvas to 800x800.
Copy and paste Paper 15 into selection and apply your mask. 
I added the Glitter resized 80% above the mask.
Doodle 1-Colorized to 210/190.
Doodle 4 re-sized by 85%.
Top Circle  and Bottom Circle I used  Paper 9  pasted into selection.
Top Square and Bottom Square - Paper 11 into selection.
Top Rectangle and Bottom Rectangle- Paper 13 pasted into selection.
Round Rectangle -Paper 16 pasted into selection.
Circle-  Paper 6  pasted into selection.
Spike frame resize by 80%- Place over circle layer.
Lips- 50% Duplicate and mirror. 
Guitar  resized 50%  rotated 25 left - sharpen.
Beaded String by Kristin resized 50% Duplicate and mirror.
Bead Resized 50%.
Speakers  40% Duplicate and mirror.
Headphones resized 25%.
Sunglasses resized by 35%  - Duplicate and mirror. Colorize one blue.
I put them on the speakers.
Skull 1 resized 25%.
Sparkles. Duplicate a couple of times and spread around tag. I 
lowered the opacity to a couple of the layers too. This is optional.
Add your tube and place it (them) to your liking.
You may use my tag for a guide on where I placed my elements, but
feel free to place to your liking.
then I re sized the tag by 67% -All layers checked.
Add any other elements that you want!!
Then I added the  Wordart- Resized 70%. 
I used Paper 2 from the kit to color it.
I also added a white layer with noise on the bottom
 of each paper layer andthe word art layer.
To do this go here.
I used 100% for the noise settings. 

Add your watermark if you wish, and make 
sure you add the copyright for the image you used.
Add your name or name(s) of whoever you want.
I saved mine as a PNG image.

You are done!

Please tick the boxes below and let me know how 
you like my tutorial. I would love to see your results! 


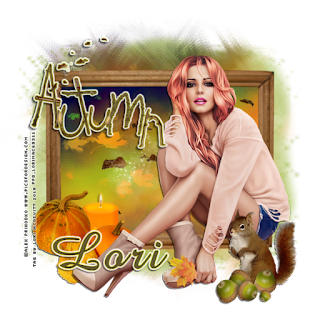
Autumn Whispers


Here is what we will be making:


Tube by the awesome work of Alex Prihodko from Pics for Design.

Horseplays Whispers of Autumn Kit Here

Mask  of choice. I used two masks:  WSL Mask 249  Here:  
It will be in a bundle in the sidebar in a download link.
 I also used my mask LLM_118 Here:  
Font: Amaze- Color #635933 with a 0.3 Black stroke. 
Image 600x600 Transparent
Select all, Add a new lalyer. Copy and paste paper of choice into 
selection. I chose  Paper 9. Add WSL Mask 249 or mask of choice.
Repeat above step for Paper 5 and Mask LLM_118  Or second mask of choice.
Copy and paste frame and resize by 75%. Click inside frame, expand by 10 and add a new layer. Then copy and paste Paper 9 or your choice of paper into selection. 

Now add your  tube and elements.
I used:
Candle-25%
38- Pumpkins 50%
Autumn wordart  45%. Duplicate. On Bottom layer add gradient glow,
 if you have the plug-in and drop shadow of choice. 
El 11-Squirrel resized 45%.
39-Nuts resized -- 45%.
Leaves resized 75% - Duplicate, Mirror and resize this layer by 65%.
Drop shadow all layers except mask layers. 

Add any other elements that you want!!

Add your watermark if you wish, and make 
sure you add the copyright for the image you used.
Add your name or name(s) of whoever you want.
I saved mine as a PNG image.

You are done!

Please tick the boxes below and let me know how 
you like my tutorial. I would love to see your results!