First I want to remind you that I use Paint Shop Pro 9, so all
of my tutorials are based upon using this program. However,
my tutorials should be able to be applied in any application.
of my tutorials are based upon using this program. However,
my tutorials should be able to be applied in any application.
The tube I used is Creo from http://www.creddy.at/index.php
St Pattys Day Kit By Mizteeque HERE.
Mask LLM Clover 7 (Masks by Lori2165) Here at the Creative Chicks Blog Creative Chicks Blog HERE.
Font Brannboll small.
I used the Bright Emerald pattern in my PSP for the Background.
Optional-Plug-In: Eye Candy 4000 for the name.
If you do not have this plug-in, you can also use an alternate. See my tutorial on Alternate to Gradient Glow here:
http://lorispsptuts.blogspot.com/p/blog-page_62.html
I also gave each template layer a white background noise layer.
To do this, click on the layer with your magic wand. Then, make a new raster layer then
expand selections by 2-3 and floodfill with white.
Deselect. Now move this layer under your paper. Add noise to your
satisfaction. I used 100% .
Shift D to duplicate- Canvas size 800x800.
Delete or Hide Info and Font Info layers.
For the mask, go to bottom layer, add a new layer, and
copy and paste Paper 1 into selection.
Do the same with Paper 9, but resize it by 105%.
Large green rectangle -- Paper 7 into selection. Delete or hide template layer.
Black circle-- Paper 5 Pasted into selection. Delete or hide template layer.
Small orange circle-- Paper 3 pasted into selection. Delete or hide template layer.
Green rectangle --Paper 4 pasted into selection. Delete or hide template layer.
Black rectangle -- Paper 6. Delete or hide template layer.
Orange rectangle -- Paper 1. Delete or hide template layer.
Taupe oval -- Paper 2. Delete or hide template layer.
Green oval --Paper 9. Delete or hide template layer.
Dotted oval-- Manual Color correction to a green color.
Here are my settings:
Black strip -- paper 8 as a new layer and resize by 65% and move it to where you like it. Selections invert and delete.
This layer I expanded by 2 for the white with noise. Delete or hide template layer.
Grey strp --Paper 3 as a new layer and resize by 65% and move it to where you like it. Selections invert and delete.
This layer I expanded by 2 for the white with noise. Delete or hide template layer.
Orange circle-- Paper 1as a new layer and resize by 65% and move it to where you like it. Selections invert and delete.
This layer I expanded by 3 for the white with noise. Delete or hide template layer.
For the Shamrocklayer, I used the Manual color correction to change the color to #35810a. Then I gave it an Inner bevel.
Duplicate the shamrock and Resize by 50% and duplicate a few more times and place them around the tag.
I used word art option 4 recolorable With shadow on new layer.
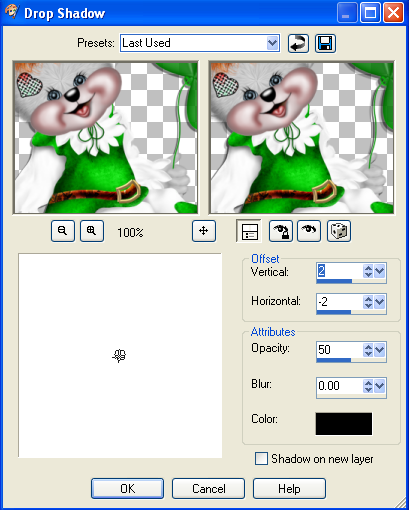
Here are my settings for the dropshadow that I used:
Resize all layers by 75%.
Elements used (After resizing all layers):
Element 2- Butterfly resized by 15%.
Element 9 Resized by 40%.
Element 12 Element 12 Resized by 35%.
Element 36 resized by 10%.
Rainbow resized by 45%.
(Add any additional elements that you like to.)
Drop shadow each layer you want.
Here are my settings for the drop shadow that I used:
Drop shadow each layer you want.
Here are my settings for the drop shadow that I used:

Add your name, copyright and watermark if applicable.
Save as a PNG or JPG. Up to you!
NOW YOU ARE DONE!
Thank you for trying my tutorial! Please tick one of the boxes below to let me know
how you liked it!
If you try my tutorial, please send me your results.
I would love to see them and show them off!


No comments:
Post a Comment